Thursday 28 July 2016

Alterations for Gentlemen

Alterations for Men are generally more involved than those for Ladies, this is because of all the heavy structural tailoring involved in good quality menswear so I wanted to provide you Gents with a reasonable guide to what might be entailed in getting your clothes altered.
Outline of alteration services; 
  • Simple – these are things like taking up trousers and jeans and will be done using a number of different methods including for trousers; simple machine job, hand caught hems and hems with tape for durability, and also jeans hems preserving the original hem (taking up the extra above the hem and relocating it).  These usually take 1-2 hours each and range from £15-£30 depending on the complexity.

  • Moderate – Jacket sleeves fall into this category, as do changing waistbands, taking in and letting out trousers, taking up jackets, putting in new pockets.  These jobs take a little longer at around 2-4 hours each and usually range from £40-£100.

  • Complex – these are the big jobs that involve major structural changes to garments. I do a lot of menswear alterations like this and it would be things like raising sleeve heads or re-lining jackets and total re-modelling.   These are the biggies that take a minimum of 4 hours each and usually cost upwards of £100 although none have thus far cost any more than £300.

Of course there are occasions where there are several processes needed in a single project; such as raising the sleeve heads, shortening the sleeves and taking up the hem of a jacket all at once, the last one of these I did took around 8 hours in total.  Here are some examples of lots of different Men’s alterations, most of which come in the moderate and complex categories.


On the right here is my lovely Dad on his and my Mum’s wedding day, his suit needed taking in and the sleeve heads raising as he had lost rather a lot of weight since he bought the suit several years earlier. (On the left is my son sporting the very first men’s jacket I ever made, it needs a bit of work and I need to learn from a Men’s specialist to perfect my skills in order to offer made to measure for men.)


One of my most recent weddings, I have altered both the Brides dress (details in my next moth's alterations post) and the Groom’s suit.  Being a slight chap I have taken up the hem of the trousers and the cuffs on the jacket, including moving all the buttons and fake buttonholes up a couple of inches.


This is the before photo of a jacket I have altered quite a lot, although quite subtly.


I have raised the sleeve heads which takes around 4 hours to complete as there are lots of layers of padding and structural reinforcement to create the perfect shoulder.


This is the shoulder after moving the sleeve heads, when you move them inwards you have to also change the shoulder to keep the opening for the sleeve the same size.


I have also let out two seams and two darts to give the client a little extra room around the trunk – he bought the suit around 30 years ago and as one ages the body changes shape, losing bulk around the shoulders and getting thicker around the middle; moving the sleeve heads and letting out the seams is much more straightforward on tailor-made suits as tailors make allowances for this and leave large seam allowances.


The matching trousers have also been let out at the centre back seam.  Good men’s trousers have extra fabric in the back seam to allow for this.


This is the inside view after letting them out around 2”.  Just letting out men’s trousers that are constructed like these ones is very straightforward and takes around an hour or so.


These are trousers belonging to a beautiful Saville Row suit my client had made in the late 1960s and would be worn with braces.  I have let them out and repaired the inside of the waistband.


This is the inside view.  You can see a repair to the pinstriped fabric I have made using heavy duty fusable interfacing, this is because the original seam was oversewn several times and with age this has damaged the fabric a little, the interfacing stabilises the tweed without having to use unsightly stitching.  The waistband was rather worn inside so I have replaced some of the lining with new cotton.


These trousers have been altered twice now for the same client as the previous ones.  A few months ago I let them out at the centre back seam but this was not enough.


The previous alteration at the centre back seam.


In order to gain some extra fabric to let them out further I have taken some of the bulk from the turn-ups and made a godet (a triangular panel) to set in at the side seams.


On a tweed like this the godet made out of the turn-up’s pretty much disappears and would be covered by the matching jacket.


The godet in detail, even a close look at the inset panel one would not really notice that the fabric used is cut on a different orientation to the rest; this is a really good fix when you have trousers you have had a long time that are worth doing the work on to get them to fit.  The existing expanding waistband had lots of extra fabric folded into the seam allowances allowing me to change it without having to add in any extra on the outside, inside I have used some 6cm wide webbed tape to extend the inside band.

I do like doing men’s alterations, gents like to get their money’s worth out of their clothes and I am delighted to help with that.  Hopefully this has given you a bit of guidance as to what is possible and how much it may cost to have the work carried out. 

If you are buying a suit but can never get one to fit properly there are a number of avenues to go down:

  • You could have a new suit made from scratch buy a reputable Men’s Tailor, if you go down this route look for time served tailors who have a really good reputation, asking someone who serves in the forces is a good place to start looking as forces tailors are amazing, if few and far between these days.  Having a suit made would cost upwards of £2,000 (or £4,000 if you go to Saville Row) these days, but it will last you for decades.
  • The next route is to buy a ready-made/off the peg suit that fits around the middle and to have it altered by someone like me who can make the major changes that may need doing.
  • Another really cost effective way to get a very good suit would be to look for a good second hand suit either online or in a charity shop and get it altered for your body shape, the above tip of the suit fitting around the middle applies here too.

If you do buy something ready-made you need to be aware that neither the fabric nor the cut will be as good as having a suit made for you, and it will not last as long as a good wool suit made in the traditional manner.

This was going to be the last instalment on alterations but having pondered it a bit I thought a separate entry for Gents alterations would be useful, I hope it has been.  Keep an eye out for the last one on Womenswear next month, it will be a bit of a biggie methinks.


Wednesday 27 July 2016

Newlyweds - Bride and Bridesmaids project

I’ve just taken receipt of some lovely photos from one of my bridal clients, this was a pretty big undertaking as I had major alterations to make on the wedding dress itself and for all of the five bridesmaids too – my poor work wardrobe was groaning with wedding work this year, it was great!


The bride is very slim, around a size 6 and the dress needed a lot of taking in on the bodice and scooping the hem up at the front.  The bodice is laced up at the back as many wedding dresses are these days and because of the bride’s slim build there was a huge length of the lacing that would be leftover, this I used to make dainty shoulder straps for a more vintage look.


You can see the bodice in more detail here and the straps make it look so much more sophisticated in my humble opinion.


Here comes the bride with all of her bridesmaids.  All but one had to be taken up at the hem and all of the Bridesmaids dresses needed the single strap changing – they were all too long by quite some way.  You will spot a difference on the bridesmaid second from the left; she was very uncomfortable with the single shoulder strap so with some leftovers from the hem I made a second strap to ensure security and comfort. Another tweak we made to these dresses was under the bust, which originally dropped straight from the bust point to the waist without being fitted under the bust, they were all very pleased with the resulting curves and it really helped the dresses to stay put without being constrictive.


 You can see the second strap much better here. 


This is the bride with some of her closest friends, on the left is another of my brides who gets wed this week,  and the new Mrs Lowe will be a bridesmaid for this next bride too, photos to follow very soon.

It has been a fantastic bridal season this year, and is still going strong, at present I am working on a beautiful Mother of the bride outfit and her daughter’s wedding dress which is in a stunning embroidered silk Dupion, I can’t wait to show you the photos towards the end of next month.

Alterations – New from Old, re-purpose, re-love, upcycling

In this instalment of my Alterations story I am going to outline how you can take an old garment that may look out-dated or tired and re-awakening them with some fresh ideas.  I love these projects, they stretch my creative thinking and give new life to much loved items and is a real joy to do – I wish you could see how happy clients are when presented with a newly revived garment that they have hung on to because they loved it so much the first time around, they love it all over again.


There are some very simple and cost effective changes that can be made to garments with a little thought and a play with some fabrics.  I have a pretty vast library of fabric pieces both large and small and I often have a good sift through to find something delightful to decorate garments with.


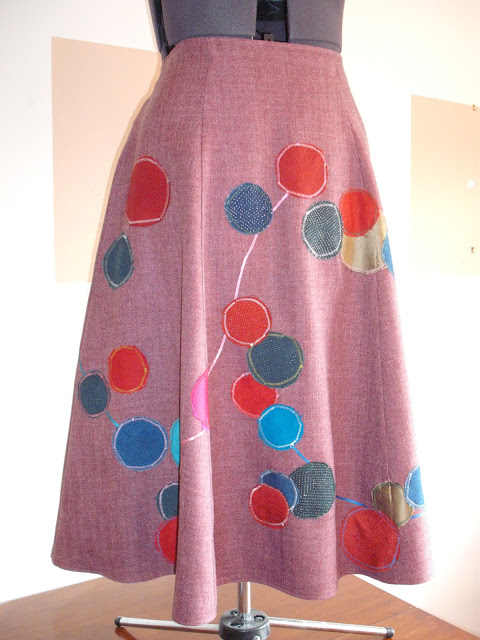
I bought this skirt from a charity shop some years ago because I loved the shape and the fabric is really nice – if a little conventional for me.  Using 3mm satin ribbon I stitched on swooping vines and then zig-zag stitched lots of circles in different colours of silk.


My client found this cashmere sweater in a charity shop too and brought it to me to brighten it up a bit, I hand stitched on some covered buttons and oriental mirror embellishments.


This blouse was quite pretty before but had a missing belt and a couple of the black buttons missing, I replaced all of the buttons for mixed vintage red ones, put some in the centre of the flowers for good measure and made a new belt with satin ribbons and a vintage shell buckle.


I could see the potential of this dress as it is a lovely shape, however, it had the ugliest buttons I have ever seen (so much so I binned them, they were too hideous for words) and using some polka dot fabric leftover from a dress I bias bound the collar and decorated the skirt and replaced the buttons with pretty red polka dot ones.


This is a skirt I really loved the first time around when I first bought it when at Uni, but I got a bit bored with it.  So, slashing some of the seams un-evenly I added some fluted frills to the lining and made it much more interesting. It swished beautifully, I loved it and literally wore it to death!


Remember my friend who’s wedding dress I made into a suit for her brother’s wedding; well this was originally one of those very long floaty skirts, and being quite small it really swamped her.  I took off the top two frill sections, turned them upside down creating a new waistline, added a waistband from another old dress, then put on straps and fluted cap sleeves – she wore to Ascot as far as I know.

These are all relatively swift additions and changes and all took between 1 and 5 hours, the next projects are much more involved, making new garments out of old ones.  These projects can take from 10-30 hours depending on the complexity.


My client called me and asked me to make a jacket for her out of some of the dated items in her wardrobe after she saw something I was wearing that I had re-loved.  The turquoise is an old pleated skirt and the mauve was a two tone dress with a chevron detail.  I used the skirt for the body of the jacket and the dress for the decorative details.


There was just enough of the dress to make the revers, collar, inside cuffs, half belt and the cheeky box pleat in the back.


Originally this was a men’s antique silk wedding kimono, these were produced very interestingly with narrow panels with parts of the pattern that are fitted together for the whole patterned design.  I made this long waistcoat and added a contrast lining and piping in silk.  To give weight and added stability to the antique fabric it is interlined with lose weave raw silk and falls beautifully.


This is one of my all-time favourite projects and was such a privilege to work on.  I was given an antique opera cape belonging to my client’s Grandmother and asked to design a formal jacket for occasional wear at formal functions.  Taking the silk velvet trim I made a soft jacket using Mutka Silk with silver Lame threads, the upper sections are cut on the straight of grain and the lower are cut on the bias to make it twinkle in evening light; the trim I used in it’s entirety to make a deep collar and edging and to decorate the cuffs.  It is lined in silver crepe backed satin silk to pick up the silver lame.


This is the back and the skirt is a remake of an antique liberty print silk skirt also belonging to a family member from decades past.


These are a good show of what can be done making one garment into another, but what if you had a garment that was completely unsuitable for you and wanted made into something more useful, or you had something other than clothes that had fabulous fabric that you thought might make great clothes?  Here are a couple of examples of that kind of idea.


My Aunt was bequeathed a reversible cotton jacket by a very dear friend, however, her friend was over 6’ tall and my Aunt is 4’ 11” so it swamped her totally.  I made it into a bag using the plain mauve side as the outside of the bag and decorated this side with turquoise satin ribbons.


And this side with mauve ribbons to suit her mood; these are her favourite colours.


Then the patterned side of the jacket I used for the lining of the bag and saved the pockets to make all the pockets to put things in.  It is now a lovely keepsake and every time it is used it makes my Aunt smile and remember her friend.


When my Mum met my lovely Stepdad, he had in his possession around 10 metres of fabric from the curtains he had had made only a few months prior to moving in to my Mum’s.  Instead of giving them to a charity  shop he gave them to me to use for something nice.  Two of my clients saw the fabric when visiting with other work and asked about it.  I have now made a jacket pairing it with turquoise satin for the lining and piping; and this stunning, full length coat that also has a big hood, matching covered buttons all the way down the front and raspberry lining and piping.


You can see the inside of the hood here and the piped half belt.  There is no pleat in the back of this coat but the skirt is much fuller than my standard coats.  It looks amazing on and comes right down to my client’s ankles – it is her “big hug in a coat”.


I hope this has given you some food for thought, have a riffle through your wardrobe and a little ponder.


Saturday 16 July 2016

Alterations – Repair & Revive

This is the second instalment of my exploration of what can be done with alterations, this time I am going to focus on straightforward repairs of the things you love, and using repairs to revive much loved garments.  Repairs can be very simple, like patches on elbows or binding a worn edge; and then some may be really big repairs that might give new life to an old coat or even be restorative to a historical piece.


This velvet jacket was a little worn at the cuffs and pockets, had moth damage on the edge of the collar and a number of buttons were missing; there was also damage to the lining.  I replaced the lining with a new blue lining, bound the damaged edges on cuffs, collar and pocket flaps then replaced all of the buttons with nice matching blue ones.  This was a favourite jacket that had served at least 10 winters and will go on for 10 more, it was an expensive jacket when my client bought it new so she was delighted for it to have a new lease of life.


A potential museum piece, this RAF NATO flying jacket from the 1950s was originally lined with leftover parachute silk from WWII, this silk was printed with a map of Europe in case the pilot was shot down during the Cold War so they could find their way home or to help – it is an extraordinary garment and very precious.


I was originally asked to repair the lining in the numerous places where the silk had degraded over time; my client expected me to patch the resulting holes but after close inspection I talked through the option of restoring the lining as carefully as I could by hand to preserve it for posterity.  I felt duty bound to save such an important historical ‘document’.  My client was so chuffed that I wanted to save his flying jacket for the future and was happy for me to go ahead.


Here is a bit closer look at some of my repairs.  This project was a real labour of love and I am really pleased with my painstaking work on it; my client’s wife called me a week or two after they picked it up to say that she had been looking at it and thanked me for saving what meant so much to her husband.


I have had two jackets from this client, both in the same state with worn out linings so this is the before view of one of them.


And this is the after view of the other one with it’s nice new lining.  Commercially made jacket linings are often cut (a) the same size or smaller than the outside of the garment, (b) with a 7mm seam allowance and (c) no overlocking.   Where the lining is cut the same size/smaller than the jacket it doesn’t have the same durability as the outside because there is more ‘give’ in the outer fabric and none in the lining so it can tear. With such a small seam allowance, if the lining fabric frays it will soon meet the actual seam and therefore tear.  This fraying can be easily prevented if the lining is overlocked.  So the new lining has been cut more generously, with a 15mm seam allowance and been overlocked.  It’s like a new jacket.


This 1950s/60s Teddy Boy coat originally belonging to my client’s Grandfather, was a big project.  For a start it needed major size alterations such as taking it in, raising the sleeve heads and shortening the sleeves.  The lining was also pretty ropy. 


My client chose a real showy Chinese style jacquard satin with Dragon pattern for the new lining, so I replaced all the inside pockets with new ones in the new lining and put back the original labels.


Last of all I ordered new covered buttons to match the lining for a bit of a flourish on the front.


This dress was originally a simple shift dress but had a little hole in the front where it had been caught on something.  After a bit of a ponder I decided to give it a makeover rather than just repairing it.  Covering the hole with an appliqued flower, with lots of friends for said flower, I created a vine with free arm embroidery.  This project was one of my Re-loved off the peg items which sold very swiftly and the lady who bought it fell in love with it on sight, very gratifying for a couple of hours work.

In the next instalment on alterations I will outline some of the projects that I have had using old garments to make new ones, or to sprinkle a little magic over something that is looking a bit tired or outdated.  The last article will include a guide to the estimated costs and time taken for a number of different alteration projects and will also cover more run of the mill alteration projects for ladies and gents clothes.

Enjoy!


Monday 4 July 2016

Alterations – Wedding Dress Afterlives

A little while ago I posted the wedding tips article, in it I mentioned what could happen to the wedding dress after the big day.  I have worked on a number of these projects, making dresses shorter in the case of less formal wedding dresses so they can be worn for other occasions; these are relatively simple alterations; and more ambitious ideas.  The two projects outlined here are two of my very favourite ones. The first is very special indeed.

I was contacted recently by a Grandmother who wanted a Christening outfit made for her youngest grandson made out of her wedding dress from 1973.


This is the original dress, it has a really charming bodice with layered sleeves and very pretty lace in the body of the sleeves and neck, and embellishing the waistline, this second lace is different from that which forms the sleeves.  There is another braid style lace at the hem which is very simple and pretty.

After looking at a number of patterns for Christening outfits we selected a rompa suit with an accompanying bonnet to be made out of the dress.  After much unpicking I had removed the braid at the hem and lace at the waist and dismantled the skirt.  I have left the bodice intact as the family may wish to use it for something else.


Using the two largest panels from the skirt and the braid from the hem I have created this very sweet rompa suit with a peter pan collar.  The plastic poppers at the crutch are on a tape and then in the back of the bodice I have used ordinary metal poppers.


The bodice of the suit is lined and the centre front has been pin-tucked and the braid from the dress hem trapped in the tucks and stitched down.


I have trapped more braid in the sleeves as well.  I must say it was pretty fiddly to make these sleeves as they are very small.


Last but by no means least is the bonnet, we all cooed and ahhed over this when my clients came to collect it yesterday. 


A number of years ago I was asked by one of my closest friends to create an outfit for her brother’s wedding out of her own wedding dress.


This is the original wedding dress, being a slim and curvy woman (somewhat akin to Marilyn Munroe in shape) I designed a subtly sexy outfit to show those curves off to best effect.


We combined the fabric from the skirt with some shot taffeta that I had left over from my second year student collection. The first element I made is this cami top which is piped with the taffeta.


The skirt has a deep yolk style waistband with a dip in the front made in the taffeta, and the main body of the skirt, made with the wedding dress satin has a double fluted frill at the back near the hem to allow ease of movement in what would otherwise be a very restrictive pencil skirt.


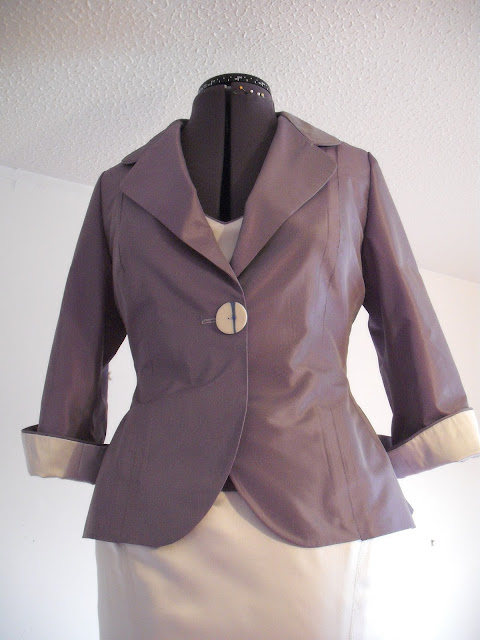
Then I made this jacket which has a fluted peplum to echo the skirt hem and decorative inner cuffs in the satin tying it all together.


Lastly, I used the bodice to make a matching handbag.

I hope this inspires you to think about how you could use your wedding dress, who wants to spend the next however many years carting around your dress in a big box every time you move house when you could have it made into something else which gives you joy and every time you wear it or use it, it will remind you of the wonderful day YOU had wearing it the first time.