Wednesday, 1 June 2016

A good challenge, making someone’s day

A few weeks ago, in the course of working for one of my brides, I was asked if I could make a tailored suit for her Brother in law to be, he has a number of physical challenges including his lack of mobility and a feeding tube to accommodate.  When I spoke to Mr C he told me a horror story about being trapped in a jacket when trying on a suit at major men’s retailers, with staff there ignoring his needs! Shocking.

So, the challenge was firstly, to make a jacket that would sit nicely, that was not too bulky around the neck, that was split down the back and closed with Velcro to make it easier to get into, and an opening for his tube to go into; all this and for it to look simply like a well-tailored suit jacket.  The trousers needed to have a soft waistband with a Velcro fly made to look like a standard one, no pockets and fully lined.

We started with the fabric, it had to be a good match for the suit his Brother, the Groom, was wearing – especially given that Mr C was the Best Man.  At Bailie House I found some beautiful English 120s Wool & Cashmere, Navy shot with Grey.  It is super soft and lovely to work with and feels more like silk!  To go with this wonderful fabric I got some very silky Navy Twill lining.  My only small misgiving with the fabric is that because it is light weight it can look a little creased no matter how perfectly it is pressed, but the big payoffs of comfort and softness far outweigh that minor point, added to this is that in the wheelchair it will get a bit scrunched anyway.

To start the suit off there was the shirt which had already been bought and needed altering and adapting.


The shirt sleeves were mighty long and were shortened as far as possible without losing the integrity of the cuff opening.


I moved the pocket to the other side and using the leftover fabric from the sleeves, made a jetted opening for the tube that sits about 8cm below the opening in the jacket to ensure the tube comes up through both without any trouble.


Next, came the trousers which are a slim cut dinner suit design without the flat piping.  We changed the waistband for a nice soft Cotton Jersey and made it much deeper to be really comfortable, to strengthen it I have used some 8cm wide elastic rather that any kind of stiffener.


Here you can see the trousers from the side with nice crisp creases pressed in front and back.
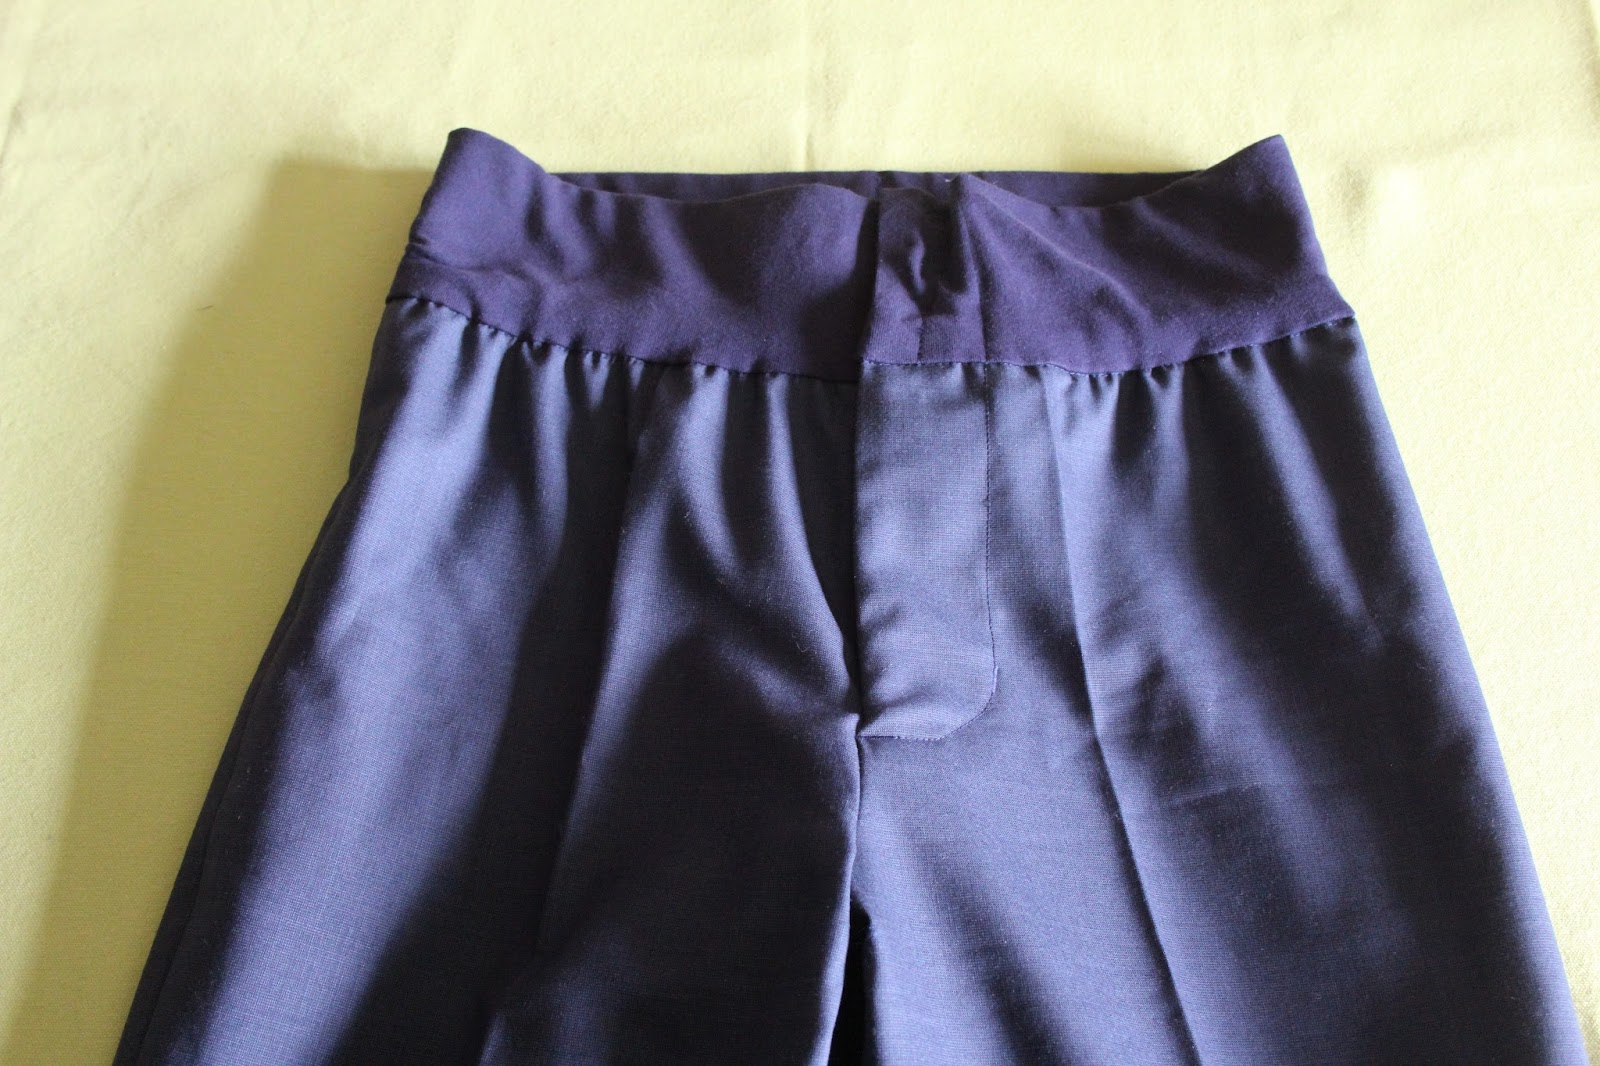

The waistband close up with the front fly in detail.


Rather than a zip and button I have used Velcro and poppers which are set in to look like zip flies.

The piece de resistance is the jacket.  The front has a welted pocket style opening at the top left and closed welted pockets on both sides lower down.  We designed the jacket without a collar to save bulk around the neck especially given the narrowness of the shoulders.  I am really pleased with the buttons; they were a fantastic find at Hansons in Sturminster Newton.


I love the buttons, they are really subtle with a matt finish, in the bag are the spares –one of each size for the front and sleeves and a bit of matched thread.  The sleeves are finished with 3 buttons and fake buttonholes.


The welted opening only differs from a normal pocket in that there is no pocket bag and a hand finished jetted opening inside.  You can also see the back neck facing similar to that of a women’s jacket which was the most practical to help strengthen the top of opening in the back of the jacket.


Here you can see the disguised welted pocket opening; I stuck a pencil in to demonstrate how little impact the tube will make to how the jacket sits.


This is the Velcro opening for the back which is so important for Mr C to be able to be dressed and escape from it relatively easily.  Finishing the lining inside was a bit of a challenge although you would not think so to look at it, it was a bit like a Chinese puzzle and I had to walk away from it and let my brain percolate for a while after the first go!


Here is Mr C in all his glory on his brother’s wedding day, it was such a delight to see him all gussied up for the day and looking very sharp.


You can see why it was important that the neckline was as slim line as possible from the side view.


The whole wedding party, the only outfits I had no hand in was the Groom and the Best Man’s second, I had done all the alterations for the Bride, Bridesmaids and Flower Girl.


When I delivered Mr C’s suit and the last of the alterations over to the Bride & Groom’s home in the week before the wedding, many the family were there to see the suit, everyone was so pleased with it and for myself, this has been one of my favourite projects since graduation in 2004.  This kind of project does not come along very often, to truly aid someone to look their very best and adapt clothing to accommodate with dignity my client’s particular needs has been a great privilege.  I love a good technical challenge and this has been a triumph all round.

Thank you Mr C for this fantastic commission and for your patience with all the fittings, I have enjoyed every minute.


Thursday, 26 May 2016

Setting in your piping

A few weeks ago I did a tutorial on making your own piping, I hope you have given it a go, I love using piping on all sorts of things and have used it:

  • To edge garments; like the front and collar of jackets & coats, and in necks and cuffs on wedding and occasional dresses
  • In seams; in the join of a yolk waistband, and as flat piping where lining meets facings in jackets
  • As embellishment; to create a window for reverse applique, at the edge of appliqued ribbon to give texture and body
  • Embellishing pockets; both edging pocket flaps on tailored pockets and flat at the top of a tailored pocket

Piping is so versatile and can give your project real finesse, piping can also be very helpful in helping items hold their shape such as a cuff or collar, and to induce tension where needed for example in a cross over bodice to stop gaping.

Here we go....


Piping has to be trapped in a seam so gather your piping and your fabric together – top tip, before you use this in a garment, practice, practice PRACTICE!


Pin the piping 1.5cm in from the edge of the fabric on the right side, top tip, my thumb is exactly 1.5cm wide so measure your fingers and find the one that is the right width so you don’t have to spend hours measuring with a ruler as you put each pin in.


Using your universal concealed zip foot, sew the piping to the fabric, using the stitching on the piping as your sewing guide.


This is what it should look like once you have sewn the piping on.


Turn it over.


Now pin your piped fabric to the other piece of fabric you are using, right sides together.


Using your previous stitching as your guide, sew the two pieces together just inside your previous stitching so that all the stitching is invisible on the right side.


The left had line of stitching is the new one.


This is what it should look like now on the right side before you press it.


If you are using the piping in a seam, press it flat with the seam allowance pointing towards the sides if on the front of the garment and towards the centre back if on the back of the garment.  Use plenty of steam, if the fabric is delicate cover with a clean cotton tea towel – I keep lots of these just for pressing.


– If the piping is an edging then turn the wrong sides together and STEAM!! Steam is your friend.


Contrast piping is wonderful in my humble opinion, so for those of you who love a splash of colour, go for it.

I hope that makes it look as simple as it is to execute, piping is a set of simple steps and until you get used to doing it just take your time and you will be fine.  When I teach this to my students they are always amazed at how straightforward it is to do, and more often than not piping appears in all their following projects because they love how it looks – so do I!

Have fun with it.

The universal concealed zip foot can be easily obtained in most sewing suppliers and online – I looked the other day and it was very reasonable indeed, my first one cost nearly £15, but you can get them for as little as £5 these days.  This foot is an amazing piece of kit, I don’t use that many feet at all, there is my standard work horse foot, my universal concealed zip foot, my Teflon foot for leather and PVC, and the buttonhole foot (I am going to invest in a walking foot soon too as there are projects that it will be very useful for but they are pretty expensive so not to be bought lightly for most of us) and that’s all you will ever need for the most part for garment making.


Wednesday, 25 May 2016

A swift reminder for this weekend and next

This Saturday morning is the Gillingham Arts & Craft Market at the Methodist Church in the high street, we open at 10am and will be there until 1.30pm. Last month was the first of the year, and the first under our new management and it was a lovely day, with lots of new makers that have not appeared in Gillingham Arts & Craft Market before.  We look forward to seeing you there to see more new makers this month.

http://www.gillinghamartsandcraftsmarket.co.uk/

The following Saturday, the 4th June, is Sturminster Newton’s Big Weekend, Crafts at the Exchange will be upstairs in the Bourne Room all day from 10am until 4pm.  There is a Makers Market in Station Road showcasing local food producers from 10am until 4pm; and a Beer Festival in the foyer of the Exchange.  It looks to be a very busy weekend, hopefully I will get to have a look at the makers market this year.


Monday, 16 May 2016

Colour Trends

Do you ever wonder how clothing manufacturers and buyers make the decisions they do about the colours of clothing they buy? Well a company called Pantone makes predictions on what they think will be popular for a given season.  These predictions are a bit of a mystery to me given that they are made several seasons in advance, however, having followed them for the last 15 years it has become apparent that for the most part they follow a gradual process of gentle changes from season to season.  Occasionally there is a curve ball, although there has not been one of those for several years now.

To view the current season, follow this link;


The present season is not my favourite I have to admit, that Buttercup yellow is a bit acidic for my taste and with the notable exception of Snorkel Blue and Fiesta the rest of the current crop of colours is a bit insipid and Iced Coffee seems to be dominating in the shops – a bit unfortunate as it washes most people out and is a hark back to the drab 1970s in my humble opinion.

Next seasons colour report can be viewed here;


I like the tones for Fall (Autumn/Winter) 2016 much more, Riverside is a great catch-all blue and I suspect denim is going to make a big splash.  Aurora Red is simply FABULOUS; I say – go for it ladies!  For those with a taste for softer reds Dusty Cedar is lovely, and Lush Meadow is really yummy as a contrast to both reads.  For those purple lovers there is a rather fabulous shade called Bodacious that you will love.


Roll on autumn methinks for a great new colour pallet to indulge in. 

A fabulous find, Wedding Buttonique

A few weeks ago I was looking around for some fabulous pictures of Bead, Button & Brooch Bouquets, I love them and personally think they make a wonderful memento for brides of their big day, or to make a gift of for bridesmaids or other special relatives to remember the wedding.  Fresh flowers are so fleeting and these bouquets can be made to include special pieces such as Granny’s brooch or some sentimental buttons from a favourite piece of clothing that is meaningful to the bride and/or her family.

There are huge copyright issues about simply posting somebody else’s pictures without their permission so I found someone making these bouquets in the UK and asked if they would send me some pictures for my blog post (it was in my top tips for weddings).  The maker I approached, because her work was so delightfully scrummy, was Jenny Sigley of Wedding Buttonique.

Jenny very generously furnished me with all the photos below with the accompanying text which deserved a whole article of its own, so here it is.


I think this is stunningly beautiful


A closer look reveals all the different elements in the bouquet, it is rather exquisite

I asked Jenny "what is Wedding Buttonique and what does she make?"

"Wedding Buttonique designs and makes unique and individual wedding bouquets for brides and bridesmaids plus a matching design for the groom and his men.  The bouquets can be made from most items so buttons, brooches, washers, wire, keys, pen nibs, bits of old ceramic, handles from grandmas old cupboard etc . . . . . basically anything goes if I can wire it to a frame!  I was once asked to add a pewter walrus to one button bouquet."

"All of my work is designed with the bride and I take photographs all the way through the process so that she is always happy."


Jenny and Tim's Wedding


Another of Jenny's Clients

Jenny explained how Wedding Buttonique started....

"I started Wedding Buttonique after my own wedding in March 2013.  I couldn't find what I wanted for my wedding bouquet so set about looking for something different.  I have always loved buttons so it seemed apt to try and use them for my own bouquet."

The colours are rainbow bright in this bouquet and the matching buttonholes are truly delightful 

How does Buttonique sell?

"Brides contact me via Etsy and we have a discussion on the item, price and when it is needed.  I can set up payment plans and a suitable time frame which all fits to what the bride can afford and needs."


 I Really like the unusual quality of this bouquet, there are some wonderfully playful additions, I suspect the client it was made for also sews given the buttons and scissors

How gorgeous these spring colours look 

WeddingButtonique Contact Details:

Twitter; @Buttonique

You can also find some more information about WeddingButtonique on Jenny's blog - which, by her own admission she hardly has time for - http://weddingbuttonique.blogspot.co.uk/


This is pretty and very gorgeously feminine

I want to thank Jenny for her contribution, I hope those of you out there who want something different to fresh flowers will consider this idea, the endless possibilities for a bouquet like this are limited only by your imagination.

Friday, 13 May 2016

Crickey, I was on the radio!

Blimey!  Imagine how exited my fiancĂ© and I were when we received a phone call from a friend stating that he thought he had just heard me mentioned on BBC Radio 4 Weekend Woman’s Hour, was a bit taken aback and had to check it out as soon as possible.  Later on in the day we sat down and listened to the Podcast of that day’s programme, and sure enough, there I was!

It all started a few weeks ago when one of the discussions during the week had been about where one’s clothes came from and the ethical implications of their origins.  The discussion was about where clothes are made and a campaign to educate consumers about the manufacturing practices of apparel producers; there was a very interesting statement that I particularly liked about what constituted a ‘fashion victim’.  The interviewee that redefined this phrase stated that it was not our western interpretation of someone who “gets it wrong” when they dress, but that fashion victims were those being exploited and sometimes dying in the course of their work to produce clothes for the consumer market.

The discussion is well worth a listen on its own merit, but it was enriched by two emails that were read out at the end, one from a manufacturer, and the other from, well, ME!  I was a bit gobsmacked that they had featured my email in full, so thank you Woman’s Hour, it made my day that I could take part in my own small way in such an important discussion.

You can downloaded a Podcast of the programme here, The #whomademyclothes discussion starts around 9 minutes 8 seconds into the programme. My initial email was read out at the very end, so stick with it.


Enjoy 

Tuesday, 3 May 2016

First Gillingham Arts & Craft Market of 2016

It was a great pleasure to be back at this fair, there was a wonderful atmosphere and the quality of the makers was fantastic. The Market has come under new shared leadership and this inaugural market was opened by Gillingham’s Mayor, David Walsh; there was a bit of a giggle moment outside with the paper scissors not up to the task of cutting the ribbon – should have asked the tailor, have scissors will travel!!  We had lots of new visitors thanks to plentiful publicity and a jolly good time was had by all.


Here is my stall set up in the corner opposite the doorway, the wedding dress caused quite a stir as it has done everywhere it has been exhibited as did the bag just in front which rolled off the line one evening in the week.


Pretty swiftly there were quite a number of visitors.


And it just got busier and busier.


At the end of the day many of the visitors stayed on to talk with the makers which was nice. Especially as many of these people hadn't been to the market previously.

Thank you to Liz and Belinda for such a great event and to Mayor David Walsh for making the day go with a bang – and a giggle!!  Can’t wait to see everyone there next month when there will be more makers, we look forward to seeing lots of you there.