Thursday, 25 May 2017

A word about Pins

I am passionate about good value when it comes to my tools, and that includes my pins too.

There are lots of brands of pins and lots of different kinds of pins. most of you will be familiar old fashioned steel headed pins such as these.

Stainless steal dressmaking pins
Some of you, like me, might find these painful to use - and jolly difficult to find when you drop them - as you inevitably will!  To over come both of these points you may use bobble headed pins like these.


Plastic head pins


And for those who like this sort of thing there are lots of pretty pins with shaped heads such as hearts or flowers.

Plastic head pins with heart shaped heads

These are all lovely and pretty, and solve the problem of not being able to see them when dropped, and they don't hurt your fingers like steel headed pins can when pushing them through fabric.

I used to use plastic headed pins myself until I discovered Glass headed pins.  These were game changers I have to tell you!  No longer did I melt the bobble heads with the iron (marking the plate on the iron), no longer did they bend at the drop of a hat, and no longer did the bobble heads come off mid use - forcing me to grab a pair of pliers to retrieve the darn things.

Glass headed pins are made with high quality nickel plated steel which is really strong, it holds it's point for a really long time and they never bend unless you hit them with some force.  Like other dress making pins they come in two lengths as seen below.

51mm and 35mm Glass head pins

Now, these pins are not cheep!  On average they are 3-5 times the price of plastic head pins, but - and this is a big but, they last 10-20 times longer!  The glass head stays on so much better than plastic, I think only one has come off in the 5 years I have been using them, this is very favourable compared to the several per week that came off the plastic ones.  I have never snapped a glass head pin and have only bent them on very rare occasions when I have hit one while sewing on the machine - which also damages the machine needle too if you hit a pin.

My favourite brand of glass head pins are Hemline

My favourite brand of glass head pins

As you can see they are pricey, but you will really appreciate how good they are.  This is an investment in great tools for your sewing, if you make patchwork they are especially good because you can iron over them.

So if you sew as a hobby, or more seriously, think about the pins you use and consider getting some glass head pins - they make great stocking fillers at Christmas for friend and family who sew too, you can get them at most sewing and craft outlets or online.

Happy sewing

Sunday, 21 May 2017

I bet some of you have been wondering where I have been over the last couple of months - moving house is the answer.  I have left Dorset behind, which is a bit weird given that I have lived there my entire life thus far, and hopped just across the border in to South Somerset to become a resident of Wincanton.  It's a nice small town with some lovely shops and a nice sense of community.  One major find is the local sewing shop called Sew & Sew.  Dianne, the proprietor is lovely and we have a great working relationship already.

My new workshop is now a dedicated space made up of two rooms, one for cutting with lots of storage for all my fabrics and stock, and one for sewing which is wonderfully lit with a nice big window and my own separate entrance.

Cutting room with lots of storage


And the sewing room - lovely and light

It is such a pleasure to work in my lovely south facing sewing room, I can look out of the window and the door into the garden and collect one's self for a moment when doing something challenging - especially working with black - the green of our lovely garden gives my eyes a lovely break.  Never realised how much I missed having a garden while living in my flat in Gillingham.

Already I am working on a couple of bespoke projects for new clients from the area, the first is a Mother of the Bride outfit in printed Cotton that my client and I met up at Hansons to buy the fabric for.

Pattern cutting for the first time in my new cutting room

 Here I am having traced off the jacket for my client's jacket, changing it ready to toile it for the first fitting.

Cutting out the dress toile fabric


You may note how closely I pin on my pattern pieces, I always pin no more than 5cm/2" apart so that the pattern piece stays put while cutting.


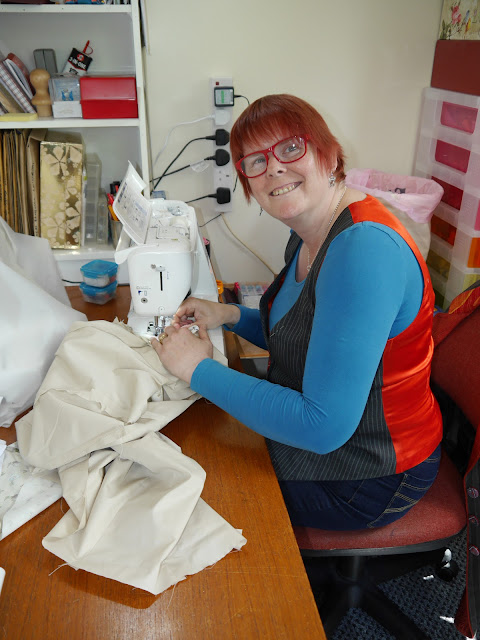
Happily sewing away on a sunny spring morning

I really love having a dedicated workshop to work in now, such a treat after working in my living room for many years - actually what started out as a living room with a work space, with my growing business it grew into a workshop with a sofa and a tele!!  For any of you who work from home, you will know exactly how nice it is to finish work at the end of the day in a dedicated room and then 'leave' work at the end of the day, with a commute of around 6 steps - and being able to leave everything out mid making is awesome.

Over the next few weeks and months there will be new shelving and other adaptations to accommodate all the work related things I had squirrelled in my bedroom and every cupboard outside of the kitchen in my previous residence that simply wouldn't fit in my work-space - there was quite a lot collected over the years!!

The very best thing about the move is that my partner and I are beginning our new life together - we went out for a day out to Weston-Super-Mare today, so have lots of new places to explore as I know about as little as he does about Somerset, despite it being so close to Dorset.


Friday, 3 March 2017

Interfacings, what to choose


What is Interfacing?

Interfacing is the underpinning inside a garment.  It can be bonded to the wrong side of the fabric, this is called Iron On.  Or, it is sewn to the wrong side of the fabric, this is called Sew In.  There are a number of functions for interfacing a garment, these are;
  • Add strength
  • Add structure
  • Add weight
  • Change the characteristics of the fabric
If you are new to sewing you might visit a fabric outlet and be a bit bamboozled by the collection of Interfacings on offer, you will be asked whether you want Iron On or Sew In, what weight you need and whether you want woven or non-woven, natural fibre or synthetic?  It’s a bit confusing to begin with until you have more experience, or until you get some information from the back of a pattern envelope.  The directions there will only give you one option, usually iron on and you will be told to get light, medium or heavy weight.

I use all sorts of things as interfacings, according to what the fabric a given project is made out of and what properties I want to introduce or bring out of that fabric – it’s amazing what you can do to change the characteristics of your cloth.

Start off with a few questions.

What is the fibre you are using, wool, silk, cotton, mixed fibres, synthetics?
  1. How thick is your fabric?
  2. How does your fabric behave?
  3. How do you want your fabric to behave?
  4. What sort of garment are you making?
  5. How much structure do you want to create?

This might seem complicated, but if you ask the questions before you purchase any cloth, production will be more straight forward and you will feel more confident that the finished project will look how you want it to.  So let’s address each question in detail.

1 – What is the fibre you are using?

Wool is very malleable with steam so whether you are using Iron On or Sew In, that too needs to be mouldable.  Knitted Iron On is ideal.

Silk is easily marked by the adhesives in Iron On – DON’T, unless you are sewing with raw silk of medium/heavy weight.  With silk you can use lots of different things as a Sew In interfacing.  For Dupion either get enough of the silk to use it as both main fabric AND interfacing if you want to retain it’s crispness, or use another fabric which has a softer fall to help it move more freely with the body.  My favourite is Wool Chalice which is a soft, loose woven very fine wool that also helps to prevent the garment creasing so easily, it can be almost as expensive as the silk though.  Another cheaper option is a good quality synthetic Crepe Back Satin, usually around £5-£10, which also gives the silk a bit of weight too.  Crepe back satin is also brilliant to use with Taffeta, silk or synthetic, which also marks easily.

Cotton is great with either Iron On or Sew In, if you want to stiffen your garment use Iron On, if you want the structure without the crispness use Sew In.

Mixed fibres and synthetics act pretty similarly, with heavier weights you could use Iron On.  However, I tend to use Sew In simply because it ultimately looks better.

2 - How thick is your fabric?
You need to match your interfacing with your fabric, fine fabrics – fine interfacing, heavy fabrics – heavy weight interfacing. 

3 – How does your fabric behave?
Unless you really want to change the handle of the cloth you are using you need to match the softness, stiffness or whatever the quality of the fabric, with the interfacing.

4 – How do you want your fabric to behave?

Big question.
You can radically change how your cloth will behave with the interfacing you use.

To stiffen, use Iron On or a crisp Sew In, the best of these is made with Horse Hair which is wonderful for tailored garments and for building up structure.

To stabilise a loose woven cloth use an Iron On, this is an especially good idea with cottons made in the Middle and Far East.

To add weight use a Sew In of some description, you can match it fibre for fibre or use something very different depending on what you have to hand and what your budget is.

To soften use a loose woven Sew In cloth that has a very soft handle.

5 – What sort of garment are you making?

Structured clothes need the best, horse hair and calico used in layers to build up shape and structure underneath the outside fabric such as in tailored jackets, this is an art form in itself and needs practice (if you want to learn about this kind of making I can recommend an amazing book – Vintage Couture Tailoring by Thomas Von Nordheim, ISBN – 978-1-84797-373-3).

Dresses with structured bodices need a good Sew In, my favourite for this is cotton curtain lining, it’s perfect, it has strength and costs very little.

For collars, cuffs and facings use a good quality Iron On (unless you are using Silk Dupion), my favoured ones are; Vilene super soft heavy weight (which has stitching running through it) and is suitable for most fabrics because it is really soft, and knitted Iron On.  These two are a little more expensive than average but worth every penny.

Shirt cuffs & collars, Iron On Buckram (a really stiff interfacing which you can get as Sew In or Iron On, and it’s great for bag making too) will give you a really nice stiff effect more akin to commercial shirts. 

6 – How much structure do you want to create?

Most patterns will tell you to use an Iron On of a specific weight, you might want to change that for a better quality Sew In and use it in layers, boning (covered is best), or add decorative top stitching as well to make really great shape and structure.

Woven or non-woven

Vilene is an example of non-woven, created by layering synthetic fibres on top of each other and heat bonded together.  If you use Non-woven I would only recommend the brand Vilene, it is the best quality and behaves as you want it to.  There are cheaper brands but I wouldn’t give them house room personally.

You can use any woven fabric as an interfacing; you just have to match the cloth you use to the properties you want.  You can buy really high quality horse hairs, wool and cotton interfacings from MacCulloch and Wallis in Soho, London.  They have several floors of goodies and are well worth a visit.
  
By now you have got the gist that pretty much any fabric can be used as an interfacing so here are some examples of what I have used lately.

Stabilised Mutka Silk

This lovely cloth is really soft with a loose weave and needs a bit of a helping hand to be used in jackets so this was stabilised with a light weight Iron On interfacing.

Vilene super soft heavy weight
This stuff is amazing, you can use it on all but the lightest weight cloth and it behaves really well on cotton and wool.

Knitted Iron On

This is a really good quality Iron On and works brilliantly with loose woven Eastern fabrics and wool coating/suitings as it retains flexibility more than any other Iron On.
Horse Hair

Especially good for tailoring as you can build it up and manipulate it to create structured shaping.
Calico, unbleached cotton that is rather crisp/stiff

Calico is very strong and crisp or stiff according to the weight you use, however, it creases like mad so use only with horse hair in the layers for a tailored garment.  For example when building up the shoulders, this will help keep the cost down as it is much cheaper than horse hair so use it in alternate layers.


Silk Dupion

I am using this at present in a bespoke waistcoat for a client.


This is the wrong side of the top collar and revers of the waistcoat

For the top collar and the back neck facing I had enough of the top fabric, but the revers have been interfaced with a bit in another colour left over from another project.


The collar, revers and back neck facing on the right side

You can see that using a Sew In with silk Dupion is really the only option.  There is a risk with Iron On that the dots of adhesive will end up coming through the silk when you press the garment, which you really don’t want.  So to preserve the perfection of the silk stick with Sew In.  I wanted to preserve the crispness of the Dupion which is why I have used it as the interfacing too.


This is the rest of the waistcoat, made with Indian cotton

As I was saying earlier, loose woven cottons from India and other Eastern countries can be very difficult to work with; they fray, stretch and distort easily.  To stabilise it and preserve malleability I have used the knitted Iron On, makes my job my easier and saves time ultimately.

Applying Interfacings

Iron On 

You will need a set of new Egyptian cotton or Irish Linen tea towels, two for white interfacing and two for black interfacing.  Using these to protect your ironing board and your Iron will allow you to use plenty of heat and steam to make the adhesive work more effectively.  You will also need to allot one of your set of two for the top and one for the bottom, the bottom one will get more adhesive on it.  To clean your towels you will have to boil them every so often, literally stick them in a big pan with washing powder (better for boiling) and simmer them for at least 30 minutes – you won’t get it all out but it will be better.

  1. Cover your ironing board with your bottom tea towel
  2. Put your piece of fabric right side down on to the tea towel
  3. Place your Iron On interfacing adhesive side down on to the fabric – the adhesive side is either shiny or knobbly
  4. Cover with your top tea towel
  5. Steam with your iron on a hot setting and press, you need to give it a really thorough press/steam for the adhesive to work properly
  6. Remove the top tea towel and allow to cool for a few seconds before lifting your bonded fabric off the bottom towel.
Now it is ready to use.


Sew In Interfacing
  1. Cut your interfacing exactly as you would your main fabric for woven interfacings, i.e. using your pattern pieces, the grain line and pin 5cm apart then cut carefully.
  2. Pin to the wrong side of your fabric piece.
  3. Sew all around the edge, using a stitch length of 3-4mm, 5mm in from the edge of the fabric ensuring you don’t let the stitching pucker the fabric, so check the tension on a scrap first.
Now it is ready to use.

Where to buy Interfacings

You can buy interfacings in any fabric retailer, for Iron On, it is worth paying for good quality, Vilene is the best non-woven by far and there are a number of brands of knitted Iron On.  With Sew In, just experiment.  You will discover your own favourites if you get some scraps and try them out on small projects.

For the best of the best you can’t beat MacCulloch and Wallis, they have the greatest variety and highest quality for a special project. 

If you do lots of sewing it is a good idea to invest in whole rolls of Iron On – they are usually 25 metres; you will get a decent discount by doing that which will save you in the long run.

I hope you are no longer confused and feel confident to make the right choice of interfacings for your projects.  Happy sewing.


Tuesday, 7 February 2017

Super Synthetics

This is the final instalment of my tutorials about Fibres and Fabrics, the focus this time is Synthetic Fibres.  There are three main groups of Synthetics;
  1. Nylon, first marketed as a fibre for apparel in 1938
  2. Polyester, the most widely used of the Synthetic fibres developed at the same time as Nylon but only perfected for clothing in the 1950s
  3. Acrylic, also arriving in the 1950s and the softest of the Synthetics.

These fibres came out of probably the most significant example of ‘pure’ research (research that has no particular end point and is an exploration of knowledge for its own sake) during the 20th Century; it has completely transformed the clothing industry.  Before the advent of Synthetics clothes were made out of natural, and in the early 20th Century Regenerated, fibres which were time consuming and costly to produce because of major limitations that dictated the amount and production of cloth. Making Synthetic fibres from the mid-20th Century onwards has been far less expensive and only limited by the availability of Petrochemicals, derived from Oil production, and the technology needed to produce them.

These fibres are produced by extracting sticky, string-like molecules from oil which are then melted and stretched in to a fine filament by various means according to the kind of Synthetic fibre to be made; Nylon becomes a harder and glass-like fibre, Polyester is a round filament that more closely resembles Silk, and Acrylic is softer than the other two.

All of the Synthetic fibres share some of their characteristics, the shared qualities being;
  • They collect or retain static electricity
  • Easily damaged by hot irons
  • Will quickly blunt needles and scissors
  • Skipped stitches and puckered seams can be a problem
  • Pills easily, (pilling is the formation of bobbles on the surface of the fabric)
  • Dries very swiftly after washing
  • Durable
  • Can be made in to a large range of products
  • Easy to dye and colour fast.
Each of these Synthetics though has individual qualities that make them suitable for different uses.

Nylon;

  • Shiny fibre
  • Elastic 
  • Woven fabrics fray easily
  • Dirt and lint cling to the surface and fabrics can cling to the needle.
Polyester;
  • Resist creasing
  • Has good elasticity and stretch recovery
  • Easy to launder and does not require ironing
  • Crisp and resilient
  • Resists moths, mildew and most chemicals
  • Fabrics are easier to sew after laundering
  • Has poor absorbency and can be uncomfortable to wear
  • Fabrics wear at garment edges
  • Attracts smoke and dust and needs cleaning more regularly.
Acrylic;
  • Resistant to abrasion, moths, sun and weather
  • Can be heat set to hold creases/pleats
  • Has low moisture absorbency but wicks well
  • Most are washable
  • Absorbs and holds perspiration
  • Some shrink badly.
However, the easy and inexpensive production, durability and the ease with which they can be mixed with other fibres makes them the prime material for making a huge variety of fabrics and other consumer goods.

My waterproof jacket

This extremely common product is a Polyester fleece lined waterproof jacket, I’ve had it for years and it still looks pretty good and does the job really well.
Super practical, lightweight shoes for all occasions
Many shoes, for all kinds of uses are made with Acrylic and Polyester materials, including the soles. From left to right are my peep toe Polyester elastic with Acrylic sole sandals, Acrylic suedette trainers and on the right are some Neoprene (a multi-layered Synthetic cloth developed for diving), Acrylic soled beach shoes.

Polyester clothing
Here are two very different finishes of Polyester cloth, on the left is a Velvet dress and on the right Georgette blouse.

Thread and notions 
Synthetic thread is the most widely used for sewing, the first three on the left are all different brands of Polyester sewing thread, the orange is the same fibre but with a lower twist value and only suitable for overlocking thread; these are produced by spinning together cut staple fibres to resemble cotton. Next come the fine and silky purple and metallic gold Polyester embroidery thread, made with spun filament fibres, and finally single filament invisible thread.  In the foreground are one of my Polyester woven labels and a Nylon (coil) zip.

Synthetic embellishments
Synthetic fibres have given rise to a massive explosion in the textures that can be achieved at little cost, ribbons and lace have become easy and very cheap to produce, the variety available is pretty well unlimited.

Nylon Linings
Nylon is shiny and makes a slippery cloth that is perfect for linings, the colour and texture of which can be varied easily in the weaving.  On the left is a twill lining and the centre and right are shiny textured linings.

Polyester Satin
Woven filament Polyester fibres make beautiful silky satins that can be very fine or heavier Duchess, these are far less expensive than Silk, around 10-20% of the price depending on the weight and quality.  These are far more durable than Silk for garments and can be easily, if gently washed and drip dried.  The earlier Regenerated satins of the early 20th Century were swiftly superseded by Synthetics because they were cheaper and more durable.

Textured Synthetics
On the left is Polyester Taffeta, this is much crisper and retains its finish far longer than Silk Taffeta, although being really crisp it still creases easily despite being fairly easy to wash and iron.  The knitted cloth on the right is mixed with a Polyester metallic thread which shimmers but absolutely kills one’s scissors and needles!

Polyester and Acrylic soft furnishing fabrics
Because they are so hard wearing and because they can be easily made into many textures, Synthetic fibres can be mixed to produce heavy and highly textured upholstery materials that don’t fade and last much longer than their natural counterparts.  These cheaper materials have brought down the cost of furnishings for the homeor workplace and make these products more attainable for all budgets.  Because they need re-covering less frequently the life of furniture is extended as well.

All mixed up with Natural fibres
One can hardly escape Polyester/Cotton mixes like the Linen Look Poly/Cotton on the right and Poly/Cotton Suiting in the middle.  This is a superb mix of fibres, it has greater durability and colour fastness than pure Cotton and is softer and more breathable than Polyester alone.  Acrylic, used as short staple fibres mixed with Wool to reduce the cost and weight of cot fabrics, and makes cloth that is easier to launder and less prone to shrink.

Sewing with Synthetics

Synthetic fibres will wear out your scissors and needles far quicker than natural fibres.  I have a very special pair of hugely expensive tailor’s shears which I NEVER use on Synthetic materials, my Fiskars scissors get sharpened annually to keep them good and sharp – choose somewhere reputable for scissor sharpening , I use Franklins exclusively and give them some Silk Chiffon and demand that this be cut like a hot knife through butter every time!  I reserve certain needles for Silk cloth thus avoiding damaging expensive fabric with blunt needles that have been used for Synthetics.  If your machine skips stitches when sewing Synthetic cloth the needle is more than likely to be blunted so change it regularly to avoid this. 

Synthetic fabrics can slide around a fair bit when sewing so if you are just starting out use pure Cotton to start with and then move on to Poly/Cotton, which has a slightly different handle.  When you feel confident move on to more challenging materials take your time.  Some Synthetics can be difficult to ‘ease’ such as when you set in sleeves but this crispness is wonderful for frills and pleats.  Satin is very slippery so tac it in the seam allowance to make it easier for yourself.  

Stretch fabrics are as diverse as any other Synthetics; some are really difficult to sew with – especially those very fine shiny ones.  Most chunkier knits and fleeces are very straight forward using Jersey needles; using an overlocker alone (if you have one) set up to use four threads is ideal for seams, it saves oodles of time, retains the fabric’s stretch and finishes as you go.  Most of us (including me) don’t have a coverstitch machine, this is the machine that finishes hems on the right side with two rows of running stitch and on the wrong side covers the edge of the fabric with what looks like an overlocked stitch.  I would love one of these machines but they are only made for industrial use so you need lots of space and would need to be using it all the time to justify the outlay as they are single use machines.

Special Synthetics

Two more Synthetic fabrics you may want to experiment with are Faux Fir and PVC or Pleather.  These can not be ironed.  In the case of PVC you will need a Teflon sewing foot and foot plate for your machine to stop it from dragging as you sew and it is easily marked by stitching and pinning, it can be easily torn too so can only be sewn once – no unpicking mistakes or letting out garments made with PVC.  With Faux Fur you will need to be mindful of the pile, combing it away from the seam as you pin it and trimming the pile in the seam allowance after sewing.  You will need to use a larger gauge Jersey needle too.

Finally, don’t be afraid to experiment with Synthetics, as with every kind of fabric there are easy ones to begin with and more challenging fabrics to try out as you get more confident.  Go for it and make mistakes – if you know someone like me, who will have lots of scraps, ask to root through their scrap box and you will find lots of goodies to play with that won’t cost you much, if anything at all.

Have fun fellow sewers.


Monday, 6 February 2017

Restoration Projects

A while ago I was asked by my client to repair a very much loved flying jacket, he was expecting me to simply patch the lining where the fabric had started to deteriorate with age.

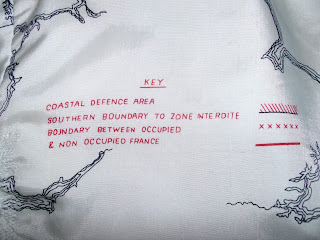
The jacket in question was a leather Nato, RAF flying jacket which was lined with parachute silk printed with a map of Europe, made to aid navigation should the pilot be shot down by the USSR at the height of the Cold War in 1950s Europe.  I regard this as an historic garment, clothes being an ephemeral document of history that need to be preserved carefully where possible.  I consulted a friend, who produces stunning hand sewn patchwork, for a little advice on the best way to precede because although my hand stitching is immaculate, much older methods are better for this kind of project.

 After talking through the nature of this proposal (due to the amount of time it would take) with my client and negotiating a final figure, I made all the repairs to preserve the integrity of the silk and the printed map.  Now the jacket will be preserved for many years to come and I hope it will end up in a museum one day, helping explain the hysteria and paranoia of the Cold War to future generations.  I don’t do many restoration projects but they are an extremely satisfying privilege when they do come along.


Sunday, 22 January 2017

Daring to Dare


While out about today, I came across a delightfully distinctive young woman in the supermarket.  She is studying at Uni in London and after chatting in the checkout queue revealed that all she was wearing, excluding her shoes, came from local charity shops.  I really liked how she pulled together clothes from a range of styles and created a look that was both up to the minute and looks back to past decades, she paid great attention to details like how the blouse collar sat on top of the jacket collar and picking out one distinct colour from the blouse as the main colour of the tied scarf covering her hair.  Thank you Elouise for a delightful chat and for letting me take your photo, good luck in your studies.

Monday, 9 January 2017

Lots of Linen


Linen is a plant fibre that is derived from the stalk of Flax plants.  Flax is grown in moist and cool climates with the highest quality coming from France, Belgium , the Netherlands and Ireland.  Coarser fibres are grown in Eastern Europe, New Zealand and Australia.

The fibre itself is part of the main stalk structure and is called ‘Bast’, which sits just under the surface of the stalk.  The Bast is removed from the stalk by a process called ‘Retting’ or rotting, this natural process is when the plant breaks down and releases the Bast for us to weave.  The finest quality Linens are left in the fields after cutting to allow dew and sunlight to break down flax stalks over 4-6 weeks, lesser quality fibres will be processed using lukewarm water which can speed up the process to around 3-5 days, chemicals can produce them far quicker – however the chemical process of retting makes course and weaker fibres that have less durability than those that are produced using natural methods.

Once the retted fibres have been collected they are dried for 1-2 weeks and then beaten and to remove the ‘shiv’ which is used to make chipboard.  Then it is combed to remove short waist fibres leaving the longer staples that are between 30cm-50cm long, these are smooth and lustrous.  It is then spun, dyed and woven into cloth.  All this processing makes Linen a relatively expensive fabric to produce, far more so than Cotton.

For a comprehensive history of Linen production across the world take a look at the CraigAvon Historical Society page, it is quite technical too which is somewhat appealing to a cloth geek like me.  For a less intense guide to Linen and it’s production in Ireland there is a great page on the FergusonIrish Linen website, although I have not purchased cloth from this company so don’t know what they are like to buy from.

The characteristics of Linen cloth are;
  • Has good moisture absorbency and is comfortable to wear, especially in warm climates
  • Is strong when wet or dry
  • Resists moth damage.
However is also;
  • Creases easily, ironed-in creases are very difficult to remove
  • Wears in folds and creases
  • Shrinks
  • Yellows with age
  • Shines when pressed without a cloth
  • Seam slippage can be a problem if the garment is tight
  • Susceptible to mould and damage buy silverfish.
And for makers you need to be aware that;
  • Frays easily
  • Does not ease well
  • Has poor elasticity.
An Irish Linen tea towel I use exclusively for pressing work
Linen is really good for protecting other fabrics during pressing when you are sewing, or just ironing your clothes made with delicate fabrics as it is lint free, if you keep them pressed and neatly folded they will serve you well for this purpose for years.

These are printed Linen fabrics for use in soft furnishings
The cloth on the left is a vintage piece that is unbleached and printed, it was produced in the 1970s/80s, the one on the right is a modern curtain fabric and is 100% Irish Linen which I have used to make Aprons and Fluffin Bags.

Natural coloured Linen Scrim
These two samples are naturally dyed, loosely woven fabrics that were used in the designs I made for Gracie Burnett when I worked for her.  This kind of Linen cloth is not the easiest to sew with as the loose weave suffers a lot with seam slippage and is not easy to launder.

Heavy Linen Suiting and Silk Linen Suiting
These two fabrics are very interesting, the brown Herringbone weave on the left is very crisp to sew with and frays like a mad thing; when sewing with this cloth I had to Overlock it immediately after cutting and before sewing with it because it practically unravelled otherwise – this made sharp corners practically impossible!  On the right is a Silk/Linen mix, this is a delight to sew with, it retains much of the strength of Linen and embraces the softness of Silk, the combination of these two fibres has produced a fabric that is less prone to creasing and is very cool for warm climates – I’ve made a few suits for my globe-trotting clients.  This cloth is available from Bennett Silks.

Some of the best Linen outlets are Ulster Linen, which I have not bought from myself although the website looks great, Ada & Ina which sell beautiful Linens for apparel and home furnishings in a wide range of weights and colours, although most of them are soft or neutral shades.  One of the suppliers Gracie used to use for naturally dyed Linen cloth is John EnglandIrish Linen
who also have a very wide range of colours and weights and their fabrics are of a beautiful quality.

Here are a few projects that I have made with Linen cloth over the years, it is pretty hard wearing and versatile, but if you are just starting out learning to sew I would develop your basic skills before tackling Linen.

A baby bag for a special pair of twins

Inside the bag
I made this bag for a relative who was having twins, a boy and a girl, and wanted a single baby bag that would accommodate all the paraphernalia for them both rather than having to lug around two bags.  It has a changing mat that rolls up and is stowed away in a zipped opening in the base.  The inside has been made using printed Linen curtain fabric and there are pockets for 2 bottles, 2 sets of nappies, 2x change of clothes and 2x favourite toys.  As far as I know it is still in use after several years – although the contents of the pockets have changed a bit!!

This is a prototype jacket made a number of years ago
It has been made with two different colours and weights of Linen, the frills are a little finer than the crisp blue Linen of the main jacket.


There are lots of contrasts in this jacket
This one has been made with two-tone, plain weave Linen, which is all naturally coloured, for the main body of the jacket.  The Linen holds the shape of the collar really well without piping because of the crisp quality of the cloth and makes it look really smart in my opinion.  All the darker panels have been made with Wool which is matt against the slightly lustrous Linen.


A skirt I found in a charity shop and fell in love with
I really love the way this lightweight Linen skirt swings as I walk in it, I rarely iron it either as it looks much more scruffy shortly afterward – I hang it up immediately after wearing or washing so that the creases drop out for the most part.  I have found this a good strategy for some (but not all) Linen garments, especially if they are bias cut or have a number of panels in the design.

Linen is a lovely cloth to work with and comes in a number of different weights;

  • Handkerchief Linen – sheer and lightweight
  • Lawn – loose weave a bit like muslin
  • Cambric
  • Linen sheeting – smooth & crisp
  • Dress Linens – medium weight 
  • Damask – smooth and lustrous used for top quality table linens
  • Crash – coarse slub Linens
  • Brown Holland – heavyweight

For those of you who like the look of Linen but don’t want the hassle of all the creases, there is a relatively new medium weight cloth made with plain woven Cotton/Polyester and is called Linen Look.  It is easy to sew with and washes brilliantly, there are lots of different printed patterns to choose from in places like Fabric Land, Hanson’s and many other stockists.

I hope you experiment with Linen fabrics in some of your projects, it is very robust for some things and I find that off-cuts make really good interfacings for tailoring.