Showing posts with label Bridal. Show all posts

Monday, 10 October 2016

My First Wedding Fair

A couple of weeks ago I was sent a text by a friend & client who had to drop out of a wedding fair at The Haynes Motor Museum and asked if I would be interested in taking her place.   I had planned to do a wedding fair this year but due to a lot of family stuff going on earlier in the year had not got round to researching and planning dates, so it was serendipitous that I was given this opportunity out of the blue.  The company that ran it is The Wedding Emporium, which I had heard of a couple of times.  The lovely staff there were amazing to organise everything for me so swiftly – even when I text them late Saturday night because I had forgotten to mention my clothes rail and they simply and calmly re-shuffled things around to accommodate it.

On arrival I was delighted to be shown to a huge plot where I could really make a splash with all my goodies.


Here I am after setting up with a couple of my dresses on their mannequins


And this is the full stand

My aim was to create a kind of ‘wall of sound’ in colour, to be as attractive and inviting as possible to draw in brides and their families, given that my business focus is much wider than wedding attire alone.  I had a bit of a helping hand from my sister Tamsin who is the manager at the Sturminster Newton branch of WessexPhotographic, she printed two lovely canvases for me on Saturday ready for Sunday which were very helpful to point out to prospective clients.  Now that I have the measure of what I need for wedding fairs I will get lots of prints of wedding related things that I have done over the last few years to create some new photo books, with separate ones for bespoke Wedding Dresses, Altered Wedding Dresses, Bridesmaids Alterations, Mother of the Brides outfits and Gents alterations and specialist suits.


Dresses and suits to suit all tastes

There were two other stands with a focus on wedding attire, as you can see there were lots of dresses to inspire and I really liked the suit hire stand where the gentleman running it wore a great morning suit with a beautiful pink cravat, although I did not get a chance to talk to him unfortunately.


Lots of gorgeous cakes to taste and see

There were three cake specialists who all had amazing cakes on display and to sample, each took a different approach to the sample tasters, Plan It Cakes who displayed mega opulent cakes is highlighted in the photo, made lots of mini frosted cakes; and Mummy’s Little Cakery offered sample cakes with a choice of frostings for folk to apply with a spatula to their favoured cake sample.  My stand was close to The Art of Cake  made by Tanya Martin, her cakes had an elegance and simplicity that I found very refreshing and she is rather lovely to talk to – I would recommend her to any of my brides.


Floral design that caused a real stir

The stand on the far left of this photo was created by Julia Moore Floral Design and there were lots of people gathered around it pretty much all the time, her flowers were stunning and her approach was incredibly professional.

Either side of me were two of my favourite stands of the day.  Somerset Wedding Campervans had two vintage VW campervans outside that were completely gorgeous – there is a pretty ivory coloured one that Jo and her husband call Lily which is utterly charming inside and out.  Natasha of The Little Photo Company had an amazing stand that included lots of marvellous printed photobooks with many genres of photo styles which were a real delight, Tash is lovely and very approachable and creative in her outlook to her work which is totally fabulous.


A fabulous day all round

I really enjoyed the whole experience and learned a great deal to make future events much more focused and hopefully very successful, and would like to thank the lovely ladies at The Wedding Emporium, especially Meghan who got my slot organised at VERY short notice and gave me some delightful feedback about my work after viewing my website and blog before we even met on Sunday morning.  It was also lovely to meet lots of new suppliers of services and makers of beautiful cakes, there was a surprisingly similar feel to many of the craft fairs that I attend and the venue at The Haynes Motor Museum is wonderful, well lit, lots of facilities and friendly staff.  I will post future dates as soon as I have confirmed them so will keep you all posted about next year.

To all the Brides and their relatives that I spoke to, it was lovely to meet you all and whether or not I hear from you in the future I wish you all the very best for your wedding days and a wonderful future in your married lives.

Wednesday, 27 July 2016

Newlyweds - Bride and Bridesmaids project

I’ve just taken receipt of some lovely photos from one of my bridal clients, this was a pretty big undertaking as I had major alterations to make on the wedding dress itself and for all of the five bridesmaids too – my poor work wardrobe was groaning with wedding work this year, it was great!


The bride is very slim, around a size 6 and the dress needed a lot of taking in on the bodice and scooping the hem up at the front.  The bodice is laced up at the back as many wedding dresses are these days and because of the bride’s slim build there was a huge length of the lacing that would be leftover, this I used to make dainty shoulder straps for a more vintage look.


You can see the bodice in more detail here and the straps make it look so much more sophisticated in my humble opinion.


Here comes the bride with all of her bridesmaids.  All but one had to be taken up at the hem and all of the Bridesmaids dresses needed the single strap changing – they were all too long by quite some way.  You will spot a difference on the bridesmaid second from the left; she was very uncomfortable with the single shoulder strap so with some leftovers from the hem I made a second strap to ensure security and comfort. Another tweak we made to these dresses was under the bust, which originally dropped straight from the bust point to the waist without being fitted under the bust, they were all very pleased with the resulting curves and it really helped the dresses to stay put without being constrictive.


 You can see the second strap much better here. 


This is the bride with some of her closest friends, on the left is another of my brides who gets wed this week,  and the new Mrs Lowe will be a bridesmaid for this next bride too, photos to follow very soon.

It has been a fantastic bridal season this year, and is still going strong, at present I am working on a beautiful Mother of the bride outfit and her daughter’s wedding dress which is in a stunning embroidered silk Dupion, I can’t wait to show you the photos towards the end of next month.

Monday, 4 July 2016

Alterations – Wedding Dress Afterlives

A little while ago I posted the wedding tips article, in it I mentioned what could happen to the wedding dress after the big day.  I have worked on a number of these projects, making dresses shorter in the case of less formal wedding dresses so they can be worn for other occasions; these are relatively simple alterations; and more ambitious ideas.  The two projects outlined here are two of my very favourite ones. The first is very special indeed.

I was contacted recently by a Grandmother who wanted a Christening outfit made for her youngest grandson made out of her wedding dress from 1973.


This is the original dress, it has a really charming bodice with layered sleeves and very pretty lace in the body of the sleeves and neck, and embellishing the waistline, this second lace is different from that which forms the sleeves.  There is another braid style lace at the hem which is very simple and pretty.

After looking at a number of patterns for Christening outfits we selected a rompa suit with an accompanying bonnet to be made out of the dress.  After much unpicking I had removed the braid at the hem and lace at the waist and dismantled the skirt.  I have left the bodice intact as the family may wish to use it for something else.


Using the two largest panels from the skirt and the braid from the hem I have created this very sweet rompa suit with a peter pan collar.  The plastic poppers at the crutch are on a tape and then in the back of the bodice I have used ordinary metal poppers.


The bodice of the suit is lined and the centre front has been pin-tucked and the braid from the dress hem trapped in the tucks and stitched down.


I have trapped more braid in the sleeves as well.  I must say it was pretty fiddly to make these sleeves as they are very small.


Last but by no means least is the bonnet, we all cooed and ahhed over this when my clients came to collect it yesterday. 


A number of years ago I was asked by one of my closest friends to create an outfit for her brother’s wedding out of her own wedding dress.


This is the original wedding dress, being a slim and curvy woman (somewhat akin to Marilyn Munroe in shape) I designed a subtly sexy outfit to show those curves off to best effect.


We combined the fabric from the skirt with some shot taffeta that I had left over from my second year student collection. The first element I made is this cami top which is piped with the taffeta.


The skirt has a deep yolk style waistband with a dip in the front made in the taffeta, and the main body of the skirt, made with the wedding dress satin has a double fluted frill at the back near the hem to allow ease of movement in what would otherwise be a very restrictive pencil skirt.


Then I made this jacket which has a fluted peplum to echo the skirt hem and decorative inner cuffs in the satin tying it all together.


Lastly, I used the bodice to make a matching handbag.

I hope this inspires you to think about how you could use your wedding dress, who wants to spend the next however many years carting around your dress in a big box every time you move house when you could have it made into something else which gives you joy and every time you wear it or use it, it will remind you of the wonderful day YOU had wearing it the first time.


Friday, 17 June 2016

Charity shop Wedding Dresses

The other week I was extolling the virtues of Charity Shops as a Wedding Dress outlet, well here is the proof of just that!  I was in Salisbury today and had time for a look in the charity shops after my dental appointment; the best place for this is Catherine Street in Salisbury as there is a large concentration of them, although there are plenty of others dotted around the city – and Fabricland too which is a bonus.  I think there are at least eight charity shops in Catherine Street that I can think of off the top of my head.


This is not the best photo I have ever taken but the sun was shining and it was a bit tricky to get a pic with no reflections with all the parked cars around.


Imagine how pleased I was to come across this lot!

The lovely member of staff on duty was very pleased for me to take photos and write this article and let me have free reign pulling some examples out to take a closer look.  I explained what I do and my views on how expensive weddings have become and we shared a bit of a discussion about it.


This smaller section is stuffed with around seven or eight Wedding Dresses, one being brand new, and some lovely Flower Girl & Bridesmaids dresses too, one of which has been lovingly and beautifully made at home by someone who is exceedingly accomplished; their rulo loops were even finer that mine.


I particularly singled out this one as it is very contemporary and I loved its simplicity and understated decoration, it would be gorgeous for a lovely summer wedding.

All these dresses are priced from around £10-£25, which in any book is a fantastic bargain, they are all in super condition and I heartily recommend that you take a look if you are in the area.

Have fun

Wednesday, 1 June 2016

A good challenge, making someone’s day

A few weeks ago, in the course of working for one of my brides, I was asked if I could make a tailored suit for her Brother in law to be, he has a number of physical challenges including his lack of mobility and a feeding tube to accommodate.  When I spoke to Mr C he told me a horror story about being trapped in a jacket when trying on a suit at major men’s retailers, with staff there ignoring his needs! Shocking.

So, the challenge was firstly, to make a jacket that would sit nicely, that was not too bulky around the neck, that was split down the back and closed with Velcro to make it easier to get into, and an opening for his tube to go into; all this and for it to look simply like a well-tailored suit jacket.  The trousers needed to have a soft waistband with a Velcro fly made to look like a standard one, no pockets and fully lined.

We started with the fabric, it had to be a good match for the suit his Brother, the Groom, was wearing – especially given that Mr C was the Best Man.  At Bailie House I found some beautiful English 120s Wool & Cashmere, Navy shot with Grey.  It is super soft and lovely to work with and feels more like silk!  To go with this wonderful fabric I got some very silky Navy Twill lining.  My only small misgiving with the fabric is that because it is light weight it can look a little creased no matter how perfectly it is pressed, but the big payoffs of comfort and softness far outweigh that minor point, added to this is that in the wheelchair it will get a bit scrunched anyway.

To start the suit off there was the shirt which had already been bought and needed altering and adapting.


The shirt sleeves were mighty long and were shortened as far as possible without losing the integrity of the cuff opening.


I moved the pocket to the other side and using the leftover fabric from the sleeves, made a jetted opening for the tube that sits about 8cm below the opening in the jacket to ensure the tube comes up through both without any trouble.


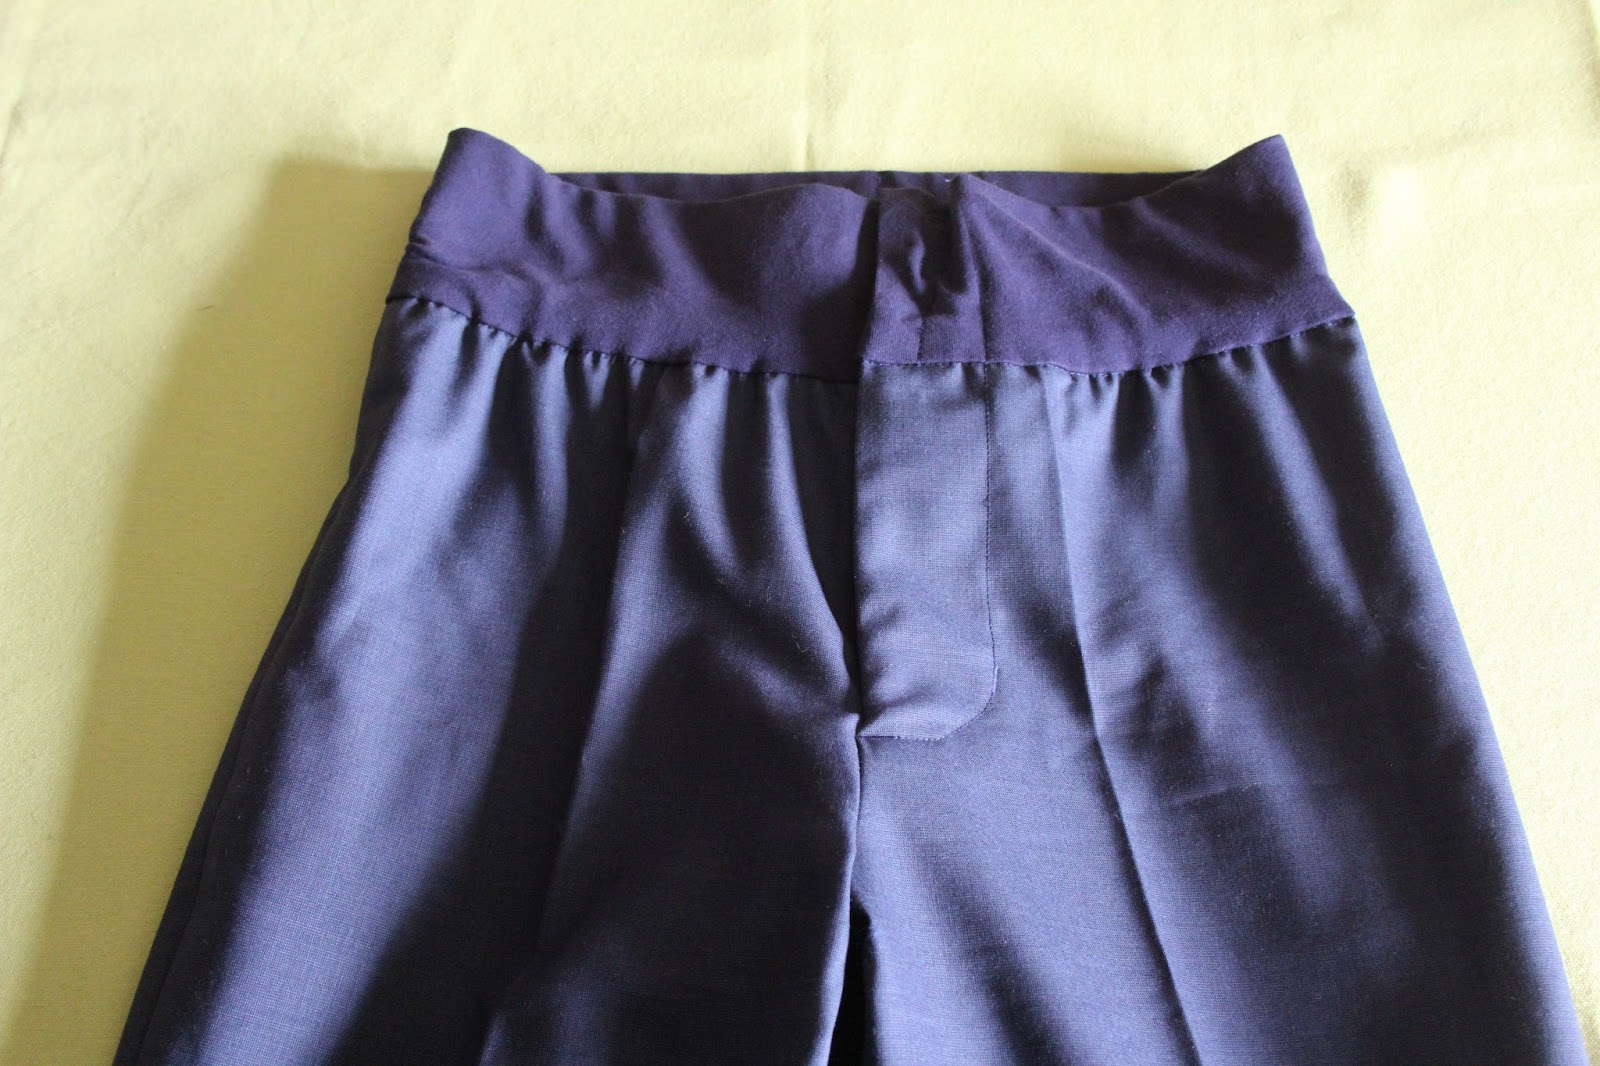
Next, came the trousers which are a slim cut dinner suit design without the flat piping.  We changed the waistband for a nice soft Cotton Jersey and made it much deeper to be really comfortable, to strengthen it I have used some 8cm wide elastic rather that any kind of stiffener.


Here you can see the trousers from the side with nice crisp creases pressed in front and back.


The waistband close up with the front fly in detail.


Rather than a zip and button I have used Velcro and poppers which are set in to look like zip flies.

The piece de resistance is the jacket.  The front has a welted pocket style opening at the top left and closed welted pockets on both sides lower down.  We designed the jacket without a collar to save bulk around the neck especially given the narrowness of the shoulders.  I am really pleased with the buttons; they were a fantastic find at Hansons in Sturminster Newton.


I love the buttons, they are really subtle with a matt finish, in the bag are the spares –one of each size for the front and sleeves and a bit of matched thread.  The sleeves are finished with 3 buttons and fake buttonholes.


The welted opening only differs from a normal pocket in that there is no pocket bag and a hand finished jetted opening inside.  You can also see the back neck facing similar to that of a women’s jacket which was the most practical to help strengthen the top of opening in the back of the jacket.


Here you can see the disguised welted pocket opening; I stuck a pencil in to demonstrate how little impact the tube will make to how the jacket sits.


This is the Velcro opening for the back which is so important for Mr C to be able to be dressed and escape from it relatively easily.  Finishing the lining inside was a bit of a challenge although you would not think so to look at it, it was a bit like a Chinese puzzle and I had to walk away from it and let my brain percolate for a while after the first go!


Here is Mr C in all his glory on his brother’s wedding day, it was such a delight to see him all gussied up for the day and looking very sharp.


You can see why it was important that the neckline was as slim line as possible from the side view.


The whole wedding party, the only outfits I had no hand in was the Groom and the Best Man’s second, I had done all the alterations for the Bride, Bridesmaids and Flower Girl.


When I delivered Mr C’s suit and the last of the alterations over to the Bride & Groom’s home in the week before the wedding, many the family were there to see the suit, everyone was so pleased with it and for myself, this has been one of my favourite projects since graduation in 2004.  This kind of project does not come along very often, to truly aid someone to look their very best and adapt clothing to accommodate with dignity my client’s particular needs has been a great privilege.  I love a good technical challenge and this has been a triumph all round.

Thank you Mr C for this fantastic commission and for your patience with all the fittings, I have enjoyed every minute.


Monday, 16 May 2016

A fabulous find, Wedding Buttonique

A few weeks ago I was looking around for some fabulous pictures of Bead, Button & Brooch Bouquets, I love them and personally think they make a wonderful memento for brides of their big day, or to make a gift of for bridesmaids or other special relatives to remember the wedding.  Fresh flowers are so fleeting and these bouquets can be made to include special pieces such as Granny’s brooch or some sentimental buttons from a favourite piece of clothing that is meaningful to the bride and/or her family.

There are huge copyright issues about simply posting somebody else’s pictures without their permission so I found someone making these bouquets in the UK and asked if they would send me some pictures for my blog post (it was in my top tips for weddings).  The maker I approached, because her work was so delightfully scrummy, was Jenny Sigley of Wedding Buttonique.

Jenny very generously furnished me with all the photos below with the accompanying text which deserved a whole article of its own, so here it is.


I think this is stunningly beautiful


A closer look reveals all the different elements in the bouquet, it is rather exquisite

I asked Jenny "what is Wedding Buttonique and what does she make?"

"Wedding Buttonique designs and makes unique and individual wedding bouquets for brides and bridesmaids plus a matching design for the groom and his men.  The bouquets can be made from most items so buttons, brooches, washers, wire, keys, pen nibs, bits of old ceramic, handles from grandmas old cupboard etc . . . . . basically anything goes if I can wire it to a frame!  I was once asked to add a pewter walrus to one button bouquet."

"All of my work is designed with the bride and I take photographs all the way through the process so that she is always happy."


Jenny and Tim's Wedding


Another of Jenny's Clients

Jenny explained how Wedding Buttonique started....

"I started Wedding Buttonique after my own wedding in March 2013.  I couldn't find what I wanted for my wedding bouquet so set about looking for something different.  I have always loved buttons so it seemed apt to try and use them for my own bouquet."

The colours are rainbow bright in this bouquet and the matching buttonholes are truly delightful 

How does Buttonique sell?

"Brides contact me via Etsy and we have a discussion on the item, price and when it is needed.  I can set up payment plans and a suitable time frame which all fits to what the bride can afford and needs."


 I Really like the unusual quality of this bouquet, there are some wonderfully playful additions, I suspect the client it was made for also sews given the buttons and scissors

How gorgeous these spring colours look 

WeddingButtonique Contact Details:

Twitter; @Buttonique

You can also find some more information about WeddingButtonique on Jenny's blog - which, by her own admission she hardly has time for - http://weddingbuttonique.blogspot.co.uk/


This is pretty and very gorgeously feminine

I want to thank Jenny for her contribution, I hope those of you out there who want something different to fresh flowers will consider this idea, the endless possibilities for a bouquet like this are limited only by your imagination.